

This is a 7-10 minute read.
The term “standing wool” is one that had never crossed my radar until 2021. Little did I know, I’d been doing work that could fall under the umbrella of the term “standing wool” since 2015. When I started experimenting with fibers, I had barely googled the history of fiber art much less done a deep dive on uncommon rug making techniques. As I continued to sew, I googled, read books, and read up on the history of fibers and textiles a bit. In all of my reading and researching, I never encountered the term “standing wool.” As far as I knew, I was on an island of my own, coiling and stitching felt together in a technique that I developed at 2am in the Visual Arts Building at The University of Richmond.

The first piece I created in 2015. Shot in my college studio
Since 2015, I’ve struggled to explain my technique to others. At its core, the technique is simple. Coiling and stitching strips of felt together. I assumed I wasn’t the only one who had thought to do this, but as I befriended more and more fiber artists from knitters and crocheters to embroiderers and weavers, all of them kept telling me “I have never seen this technique before!”
And so I continued thinking I was alone on a little island within the sea of the fiber arts community. I was unsure of where I fit in among a group of people with clearly defined techniques and patterns and histories. I played with a variety of names for my work and my favorite mouthful is “freeform fiber art wall hanging.” Which is long and vague and doesn’t really tell you what I am doing.
Fast forward to early 2021, I was working on an updated version of my artist statement and chatting with my husband, Adam. I was telling him how my fiber work looks similar to quilling - a technique done by coiling paper. He googled something like “quilling but with fabric,” and eventually stumbled upon the work of Kira Mead, a magnificent fiber artist based in Australia. He called me over excitedly telling me that there are other people out there making work that is visually similar to mine and the term used to describe the technique is “standing wool” because the wool stands on its edge when you stitch it.

Detail shot of one of my largest works to date, created in 2019
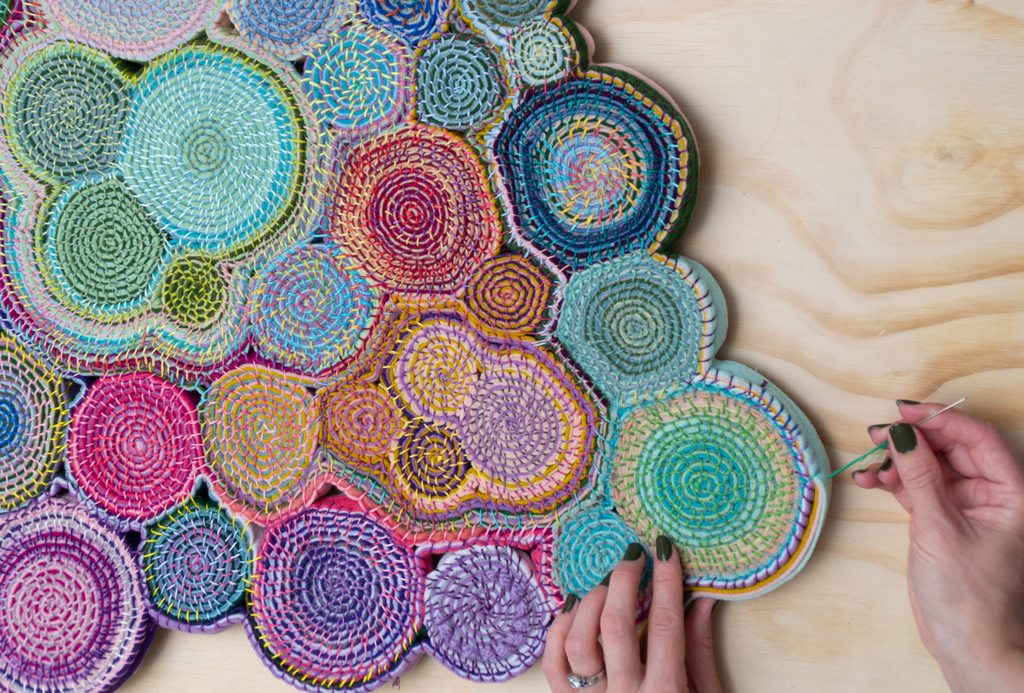
Standing wool is a term ascribed to rugs made by coiling strips of fabric, often felt, and stitching them together. The smaller coils are bound together creating a large rug.
This feels like a good time to interject and state that I have never personally made rugs. All of my standing wool work is purely and explicitly meant for the wall and to be decorative. The way that I back them makes them rigid so they hang well on the wall and they would be terrible for the floor. Especially since many pieces have beads and sequins onto them. Please do not step on my art. I would be so sad. Okay, back to the technique.
This kind of rug making was popular before the Industrial Revolution because it could be done using scraps of extra fabric and was quite simple. All you need is a needle, thread, and some fabric. It was, and still is, a slow and manual process. This also meant that it fell out of use during the Industrial Revolution because there wasn’t a way to automate the slow, hand sewn process.
I’ve found two main books that touch on this technique and I’ve linked them here and here. Standing wool is often mentioned in combination with a few other techniques including shirring and sometimes latch hooking or punch needling. They are all siblings in the same family of techniques in my opinion. Latch hooking and punch needling have been quite popular in recent years too!
One thing that became immediately apparent is that while the vast majority of the standing wool pieces I’ve seen out there on the internet hide their stitches by stitching horizontally into the coils, so the stitches are invisible. I use an overhand stitch so all of my stitches are visible on the front of my work. This is why I said I fit under the umbrella of the term, but I would not be creating classic or traditional standing wool work, especially since I don’t make rugs.

Expand, a work from 2021 that features over stitching and some hidden stitches
My initial concept for creating art with fabric when I was in college was very loose. I had been working with oversized floral shapes and experimenting with large scale paintings, carved pink insulation foam, paper installations, and a variety of other techniques with mixed results. I was creatively stuck. None of my ideas were really coming together how I envisioned them and I had deadlines looming.
I’d sewn my whole life and drawn and painted for as long as I could remember. Reaching back into fibers when all of my other ideas had dried up made sense to me. Joann’s was filled with bright colors that reminded me of the paint I was using, so I stacked my arms full of scratchy acrylic felt and bought yards and yards of the stuff. I still had large scale flowers in my head and knew felt wouldn’t fray when I cut into it. And it was cheap and I was a poor college student. Wins on multiple fronts in my book.

My first batch of felt, back in college, 2015
I dragged all that yardage back into my studio and started to play with it still thinking about creating a more literal flower form of some kind (while not accounting for the floppiness of felt, oops). That was when I started coiling the felt strips and stitching them up. The felt was wavy on one side, to mimic flower petals, and I was stitching on the “back” to make this large, floppy, concave felt “flower” that I was dragging back and forth in a cardboard box from my studio to my dorm so I could keep sewing late into the night. It is comical to look at now because the thinness of the felt I was working with was never going to create the effect I had in my mind, but it did work out in the end!
The next crit (critique - the formal term for when we all get our hearts ripped out by our peers and professors as art students) rolled around and I dragged out my cardboard box with my half finished, floppy, felt flower with a grand gesture. At this point, I’m a senior in my final semester of college. I’m working on my Honors Thesis and I am stuck. Like, very very stuck. My professor picks up my humongous floppy felt flower and gives me a reserved “hmmm….” which is not a great start.
Then he flips it over, revealing thousands of sloppy stitches. And then I get an “ohhh!” which is a much better response. We chat about my goal for the piece and the process I came up with to create it and then we talk about how all of the work and the stitches are creating their own pattern that is much more visually interesting and tell a completely different story that my floppy flower on the other side. The thinness of the felt is pointed out as an issue as well, which I really should have seen coming. The front was not working as I had hoped at all. One of the professors tells me that seeing my hand and the human touch of the piece through the stitches is much more compelling and personal.
This is, honestly, a watershed moment for me as an artist. As a painter up to this point, I was meticulously hiding and blending out my brush strokes. I wanted the softest most subtle fade you’d ever seen. So smooth that you’d barely even know my hand touched the canvas. I wanted to hide my presence in the work and hide behind it. The idea of putting all of those chaotic stitches on display was both a gut punch and a moment of brilliance. If I put it all out there, there was nowhere to hide. Everyone could see each stitch, every moment of work, every inch of time that I’d spent and in some way, they could read me through that work. It felt terrifyingly vulnerable.
The meditative process of creating those stitches to make that floppy flower had become my lifeline. This was my last semester of the hardest four years of my life so far. My Dad died unexpectedly a year prior as well as other stresses in my life that I thought would break me before I could graduate. I was a few short months away from filling an entire gallery with work that didn’t yet exist.
And then I started sewing. Slowly. By hand. Building that floppy flower one stitch at a time and it felt like I was sewing myself back together again. Each stitch was a meditation. Each stitch marked the time I’d worked on that piece. Time I had to sit still and do one single task. It was slow and it had to be. And I wanted to hide it all because it felt raw and vulnerable and secret. I didn’t want to have to talk about why stitching was what I wanted to do. Many people wondered if I could create a similar effect much faster if I glued it, but I couldn’t glue it. I had to sew. And I sewed and I sewed and I sewed.

The Floppy Flower, formally titled Equivocation, shot in my mom's backyard, 2015
I finished the flower and shoved it in a corner to figure out how to display it later and decided to explore what it would look like if I really gave the stitches a chance. If I went in planning to show the stitches off, what would I make? I showed up at the next crit with the beginnings of a new piece in my hands and I could have sworn there was a collective gasp. Multiple professors responded positively. I was onto something! Or so they said. And so I kept sewing. And I resolved not to hide the stitches.
Those stitches are a language all their own. They are a quiet, personal, meditative dialogue between myself and the work. They do not judge. They just listen and record. They recorded every moment I spent in the Visual Arts Building slowly stitching myself into a quieter head space. The soft predictable repetition of sewing gave me space to just be during a time that I felt lost. It brought me back into myself in a way I didn’t know was possible. It grounded me.
The “second” piece is the one I consider my true “first” piece because the floppy flower was an experiment that taught me a lot, but my intentions with that piece were miles away from what my intentions were with the next piece. That piece, named Burgeoning, is what I point to as my “ah ha” moment. The time where I knew fibers were it for me. The time I finally left crit with hope.

Burgeoning, the piece that followed the floppy flower and set me on my standing wool path, 2015
So now, many years later, I still stitch on the front against the tradition of the technique I didn’t know existed. There are times when people see what the “inside” looks like, AKA the back before I stabilize and seal it, and they often gasp and tell me “well that side is beautiful too!” Or sometimes, they tell me they even like the back better than the front. I do not have the energy or heart to tell them the lengthy and deeply personal self-discovery process that made those stitches on the front so important to me, so I usually just chuckle and smile.
There are sections of my work that use hidden stitches because I enjoy the contrast and the punch it gives, and in my mind it is a small nod to the floppy flower that started it all, and a nod to the tradition I was yet to discover for so many years. But the fronts will always have stitches. Those stitches made me the artist I am now and there is not an ounce of hyperbole in that. They gave me the confidence to assert my hand and my presence in my art in a way I’d never been comfortable with before.
Thank you for sharing your journey. I feel like I’m at that beginning stage, waiting for the ah ha moment
Alexis Noakes on
What a lovely way to create interesting three dimensional quillie like forms! Thank you very much for sharing. Your art is lovely.
Aileen Cassells on