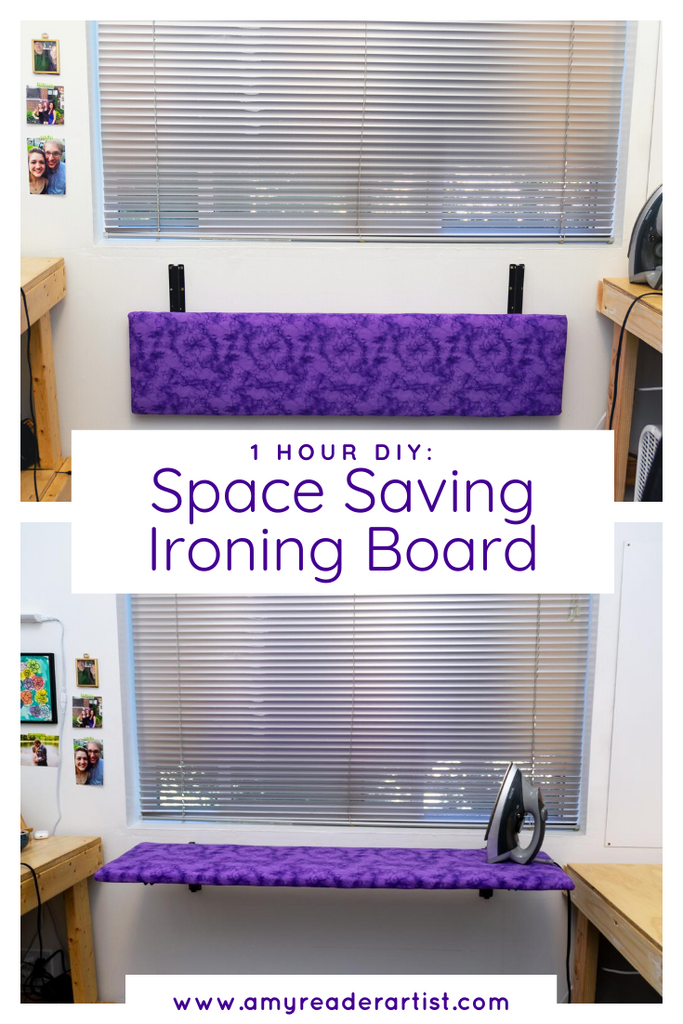

I moved into a new studio space this month! While planning the layout of my new workspace, one issue I ran into was that my ironing board didn’t have a great home. Right now I’m ironing in batches so I will only need to have it out for an hour or two at a time. After I decided I wanted to have two large work tables on either side of the room, the ironing board made a lot of sense between the two tables. Enter - the drop leaf ironing board! It folds flat against the wall when I don’t need it saving me space!
One of the most satisfying DIYs is one that is quick, easy, and functional. It took less than an hour from start to finish and it folds flat against the wall when it’s not in use. I love that it saves me space and storage for the ironing board is built in so when I need to iron I don’t need to fumble around with setting up the legs and breaking it down. Part of me wanted to design a completely custom drop leaf style system, but then I googled and found out I could simply order drop leaf shelf hinges. After building myself a second table from scratch, I was tired and decided simplicity would be best for this DIY.
To make a DIY drop leaf ironing board, I used:
Two drop leaf shelf hinges (I purposefully bought hinges longer than the wood I had so that I could feed fabric over the other side of the ironing board as I moved through large pieces of fabric)
I used these brackets from Amazon in the 16" size
- One board 1”x12”x48” (you can make this as long as you want for your space or use any suitable scrap you have in hand)
- Cotton quilt batting
- Cotton fabric
- Staple gun and staples
- Drill, screws, and drywall anchors
- Level
- Pencil
- Scissors
- Measuring tape/ruler
For this project, I already had a board on hand that was 1”x12”x48” so I just used that. I also already had the cotton quilt batting and fabric. For an ironing board, I wasn’t confident polyester batting would hold up to the heat because I don’t have a lot of experience with it. The only purchase I had to make was the shelving brackets!
Alright let’s get to it!
Step one:
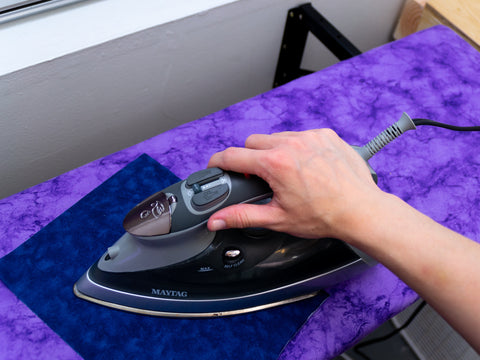
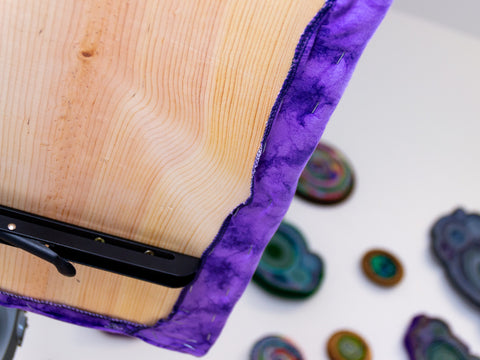
Attach quilt batting to your board.
I used three layers of batting. I laid them all out and moved around the board stapling as I went. To create even tension, I found it best to staple once in the middle on each of the four sides first. Next, I stapled in between each of those staples and repeated this pattern until the batting was attaching evenly. It should be smooth and fluffy without any lumps or wrinkles. The batting was stapled to the edges of the ironing board. The fabric cover will be stapled to the underside.
Step two:
Measure and cut the fabric for your board.
I eyeballed this, but for this size board my fabric was about 16”x52” - adding two inches to each side to allow the fabric to wrap around and underneath.
Step three:
Staple the fabric to the board.
I followed the same stapling pattern of one staple in the middle of each side again, but this time I stapled the fabric to the underside of the board for a clean, wrap around edge.
Step four:
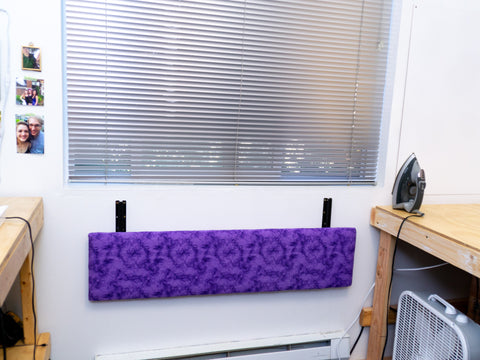
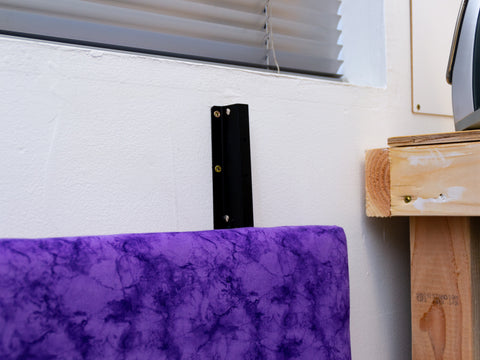
Measure out where the top of the drop leaf hinges will sit on the wall.
In my studio, the best space was below the window and I knew I wanted the board to rest at a comfortable standing height. I knew I wanted the hinges to be close to the ends so there would be room for fabric to feed out the back while I ironed. The hinges sit about 5” in from each end. That meant the space between the hinges was 38” accounting for the width of the hinges themselves. Using a level, pencil in the top line where the top of the brackets will hit (mine are 36” high). Mark a perpendicular line out where the outer edges of the brackets will line up to ensure your brackets are perfectly straight.
Step five:
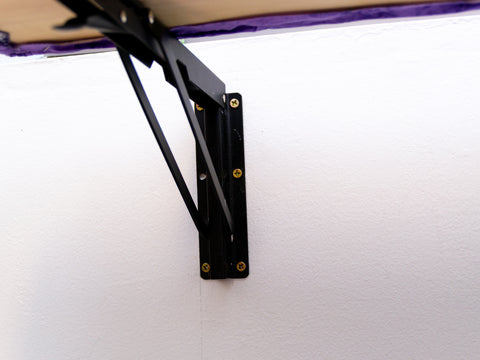
Mark out where the screws will go and predrill your holes. Attach your shelf brackets to the wall.
If you are screwing into studs, use long wood screws and screw your brackets into your predrilled holes. If you’re screwing into drywall, you’ll want to insert drywall plugs first before you screw in the brackets. Those are installed by drilling a larger hole, hammering or screwing in the plug, and then lining up your bracket and screwing into the hole in the plastic plug. These can be found at any hardware store and usually come as a set with both the plugs and screws. I held up the brackets, traced in the places where the screws would attach, and then predrilled and inserted the drywall anchors.
Step six:
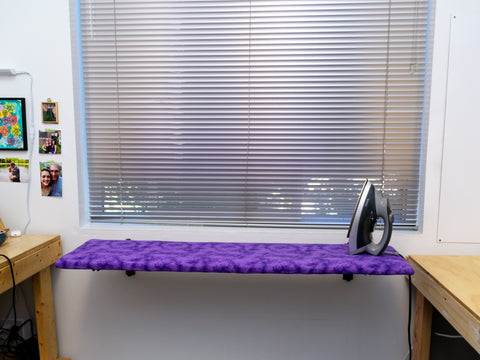
Screw the ironing board onto the top of the shelf brackets.
I used short wood screws and popped it on close to the front edge of the brackets. This left a gap at the back like a standard ironing board so I can feed long yardage over the back while I iron!
Step seven:
Enjoy your new ironing board!
All in, this took me under an hour from start to finish. Since I’ve been making a lot of masks right now, I tend to iron in spurts so being able to pop up the ironing board as needed has been perfect. I also appreciate how much space it saves. Since my drop leaf ironing board is right next to both a table and a window with a spacious ledge, I have several places to store my iron when I am not actively ironing. I keep a few essentials on that ledge - like a spray bottle filled with water for stubborn wrinkles - and an ironing ham.
This quick and easy drop leaf ironing board suits my needs perfectly right now and I imagine it would work well in any smaller crafting or sewing room or studio where you want a spacious ironing board but want an easy way of storing it when not in use! Another thing I’m excited about for this is that it will be easily reusable in future studios. All I will need to do is unscrew it from the wall and keep it attached to the board and screw it in at the next place!
what a great idea, thinking of one with insulbrite on the botton and a wool pressing mat over it, made to fit the pressing mat, thank you for the information and the inspiration.
Bonnie Jessmer on
Wow, I never knew you could buy folding shelf brackets! Your ironing board idea is simply BRILLIANT!
I bought two 2ft by 4ft all-wooden kitchen islands (on sale of course) on which I installed casters. On the first one I made an ironing board like yours with 1/2" plywood (although wider) then screwed it onto the top. I’m a quilter and as you said, it’s great when ironing large yardages. The islands each have two shelves for storage, a wide shallow drawer under the top and I can roll each around the room anywhere I wish, let alone other rooms in the house. Similarly on the second island, I did the same, but sanded, rounded off the edges and corners of the plywood, then painted it, attached it, and plopped my 36×48 cutting mat on it – works great! I can also butt them together, lock the casters and I have a great surface to lay out a quilt for sandwiching. One of the best things about these is they’re just the right high for ironing and cutting – no sore back from bending over. And they give my smallish sewing room lots of flexibility. But boy, do I have ideas and uses for those brackets!!!!! They’re going to make my life a great deal better. Thank you SO MUCH for showing them to us! I’m just thrilled to know about them! Amazon, here I come…..
Suzanne on
This is such a great idea! I’ve recently set up a small dedicated sewing area and the ironing board is always in the way, it seems. I wonder if my old ironing board top could be screwed into the bracket (without the legs of course). Would that be at all possible, you think?
Thanks so much for the inspiration!
Maria on
Hi Elizabeth!
I chose to use the regular cotton I had on hand instead of ironing board fabric simply because that was what I’d used before so it was the easiest option for me. In previous versions of my studio ironing board, I replaced the fabric by popping off the staples and stapling down new fabric when needed. The addition of the drop leaf brackets happened in 2020, but I’ve been using some version of the wood + batting + cotton ironing board for 5 or so years and so far it hasn’t let me down yet!
Your ironing board set up sounds lovely and convenient as well! It is so fun and interesting to read how other people have setup and optimized their creative spaces. Thanks for sharing about your ironing board!
Amy (Author) on
What made you decide to use cotton fabric instead of the “ironing board cover” fabric that you can get by the yard at local craft stores? My dad helped me make a semi portable craft table. It has drawers and I can iron fabric up to 6 ft wide. But when setting it up the first thing I did was buy ironing board fabric because I use it so much I had to be able to replace it every few years. You were smart to choose cotton only for batting as blends can melt.
Elizabeth on
I used these brackets from Amazon in the 16" size: https://www.amazon.com/gp/product/B07GWCJZNC/ref=ppx_yo_dt_b_search_asin_title?ie=UTF8&psc=1
I’ll update the post with this link too!
Amy (Author) on
Will be perfect for my new walk in closet! Can you tell me what brackets you used?
Carol on
This is brilliant! Thanks for the inspiration!
amanda on
This has inspired me! I’m in the middle of redecorating a tiny single bedroom, 10′×6′, (yes that small!),
which I use to sew and do my ironing. As you can imagine it’s a tight squeeze fitting in a single bed, a chest of drawers, sewing table/desk and ironing board! As I never close up the ironing board as it’s so awkward to do, I’ve been searching for ideas and was so pleased to see your idea. Now I have to check that my wall would be sound enough to support the brackets, being an old farmhouse.
Fingers crossed, but thank you.
Frances on