
...a microwave!
This year I knew I wanted to take some time to try some new things in the studio - one of the first on my list was dyeing my own yarn. For this project, I dyed a skein of Eleanor's Wool. I have had a few colors that I've been searching the depths of the internet to find in a fiber that meets all my requirements, and sadly have not yet found it. So I figured what a perfect opportunity to start learning to dye my own fibers!
Wait a second, who is Eleanor and what are you going to do with all that yarn?
I'm so glad you asked! Eleanor is my little sheep buddy at Joyful Roots Farm in Michigan. I purchased a skein of her fluffy wool last year and have been wanting to dye it for awhile! Part of my mission for all of my materials is to find ethical and humane sources. I connected with Joyful Roots Farm and saw the love and care they give all of their creatures and instantly knew I wanted to get my hands on some wool from some very happy sheep. You can read more about my material sourcing methods and ethical/environmental commitment here.
Currently, I am designing the Spring/Summer collection to be launched later this year, and I've been looking for some specific colors for that collection that I just haven't been finding. So this was a perfect opportunity to try to learn a bit of dyeing to see if I could create the colors I have in my head! Moving forward, I would like to dye more of my own yarn for my fiber art jewelry pieces.
As I went on this big google education, I knew I wanted to start with food/kitchen safe dyes that would be easy to do in our small apartment kitchen. Right now we have one sink and just three pots. I'm not ready to convert any of our food vessels into dye-only containers just yet. When you work with some mordants and dyes, those pots can never be used for food again. While I might invest in a more robust dye set up in the future, for now I want to keep it simple and kitchen safe.
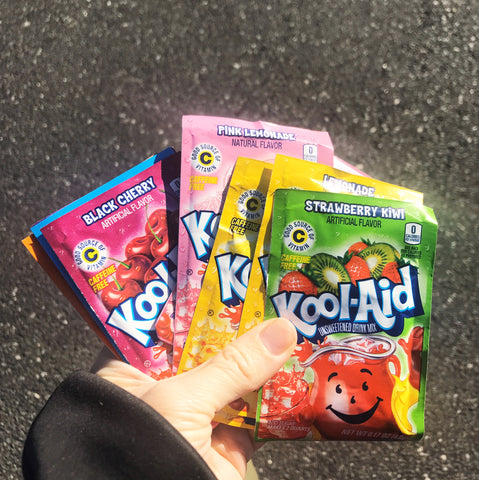
After further research and consulting my fiber BFF who dyes all her own yarn (thanks Syd!) I landed on starting with Kool-Aid. Kool-Aid is acidic on its own so it doesn't require an additional mordant to set the color in a protein fiber like wool. All you really need is a microwave, water, Kool-Aid packets, and a bunch of jars. And yarn, you definitely need yarn. Keep in mind, this only works on protein fibers - 100% wool, cashmere, alpaca, anything that was shorn from a fluffy creature. Acrylic and cotton will not work for this process.
I chose to work with Kool-Aid first for a few reasons.The first of which is cost. This was a very cheap way to get a taste of the dyeing process and at the grocery store a packet of Kool-Aid is about $0.20. The cost of one skein of wool and a few Kool-Aid packets should all be under or around $20. Secondly, like I mentioned above it is kitchen safe. So I won’t be ruining any of my pots and pans for something that I may not even end up liking (spoiler alert: I loved it!). Lastly, I wanted something that would be fairly quick and not require too much extra fuss. Kool-Aid is easy to find so I didn’t have to scour the internet for any particular dye color or chemical.
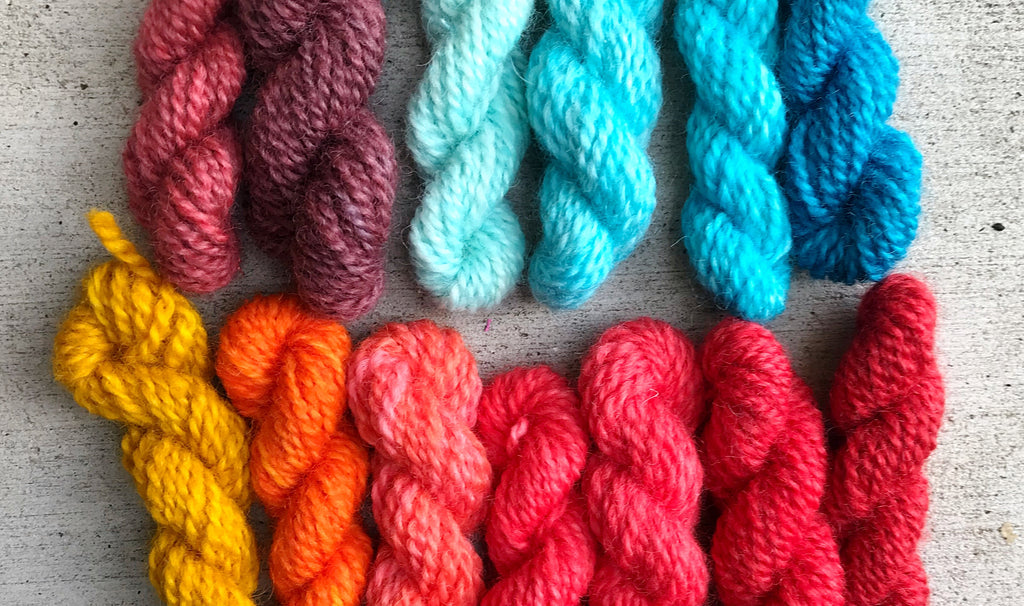
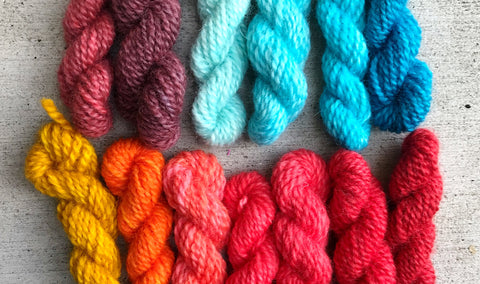
Round one of Kool-Aid dyeing was very organized. I did a second batch and it was not quite as tidy as this one, but still pretty organized. I ended up with a small rainbow of mostly red with a little bit of blue. The actual “work” time was under an hour. Most of my time was spent waiting and gently poking my yarn to see if the color had absorbed.
Okay, so are you ready for my foolproof Kool-Aid dye method? Great.
Step 1: gather materials:
- Kool-Aid packets
- wool yarn (must be wool/alpaca/come from a sweet, fluffy, living creature)
- an assortment of jars
- big bowl
- forks
- counterspace
- microwave or tea kettle
Step 2: prep your materials
- I wound small bundles of yarn ranging from 5-7 grams using a small kitchen scale. I then clipped off 3" lengths of test yarn.
- Microwave or boil water in a kettle.
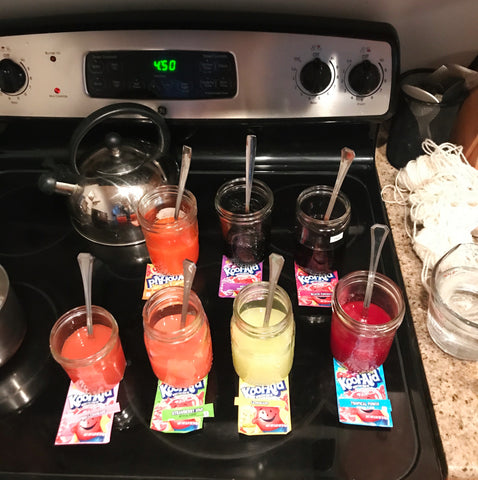
- Empty your packets into your jars and then add HOT water to each. Stir.
- Small note - leave the label end of the Kool-Aid packet underneath the corresponding jar to remember what colors are in each jar
- Fill a bowl with HOT water. Add your yarn to presoak (this helps the color take evenly)
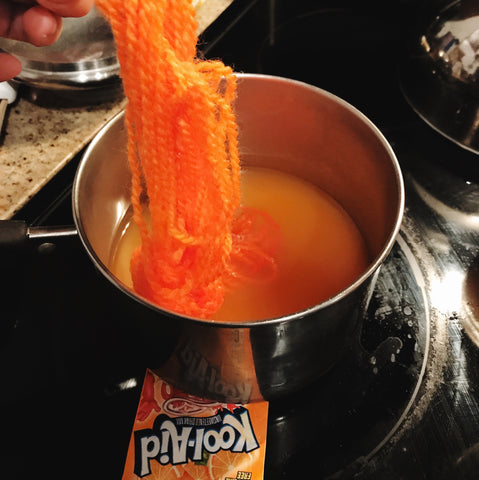
BIG IMPORTANT NOTE: be VERY careful not to stir or agitate your wool much. Stir it as little as possible or else it will felt. One of my colors felted just a teeny bit in a few places because I couldn't resist the urge to stir just a little. Don't do it.
Step 3: add your yarn to your jars of dye
- That's it. Let them soak. Then wait.
- The dye bath will change in color as the yarn absorbs the color so the water will eventually turn white or clear and that is how you know the bath is exhausted.
Step 4: Carefully rinse your yarn
- I filled several bowls with water that were the same temperature as the dye bath (drastic changes in temperature can cause felting!) and then soaked the yarn in the clean water bath for about 30 minutes.
- Then I carefully rinsed each skein under warm water for about 30 seconds to make sure the water was running clear.
Step 5: Let yarn dry, and enjoy!
A few hot tips:
- Most of the colors are pink/orange/red and I ended up with a lot more in that color family than I was expecting. The blue/green color packets were hard to find in grocery stores and I ended up ordering a multipack online to get some other colors.
- The lemonade was VERY weak. I will be doing a third bath to get the strong yellow I'm after. It will take about 6 packets to get the strength of color I want.
- Write everything down! I have been keeping a Google sheets document full of my dye process and info. I also snipped the little name off the packet and kept that label with the skein that had been dyed with that color so I knew which color made which skein.
- Overdyeing isn't as much of a concern. I double dyed several skeins that were too light, or too much of one color, and the second bath took the color really well! I watched the yarn closely to make sure it didn't end up too saturated, and I was very happy with the second bath double dipping!
I hope you've learned something today! Up next, I'm going to experiment with some food coloring and natural dyes! I've already successfully dyed a skein with turmeric (more on that later) and I'm excited to continue to explore this process!
Have you tried dyeing yarn with Kool-Aid or food coloring? Tell me how it went!
